Recently, one of our Enterprise clients asked for some help installing SSL certificates on their Acquia-hosted Stage and Development environments. This is not something that Acquia seems to provide (they do provide basic SSL on dev/stage environments, but not with hostname matching), so we set out to get them set up. They use their dev and staging environments to demonstrate new content and features to stakeholders, and some were getting scared off by the SSL certificate warnings.
Rather than pay, we decided to try it out with Let's Encrypt, which if you haven't heard, is the amazing and relatively-new Certificate Authority that provides FREE CERTIFICATES, and has a mission of enabling SSL everywhere.
 Get Certbot
The first thing you need to do is download certbot. Certbot is a command line tool from the EFF for managing SSL certificates with Let's Encrypt. At Redfin, we use Macs with Homebrew, so the easiest way to get the tool was to enter `brew install certbot` into a terminal. Now, there's a "certbot" global executable to use.
If you follow the "download certbot" link above, and for example enter "Apache" and "Ubuntu 14.04," you'll get instructions for how to install certbot on other platforms.
Once you have certbot downloaded, you need to run the "manual" method of validation. This feels like the old familiar way of verifying site ownership--adding some files to a particular directory. Let's Encrypt then calls out to that URL, and if it finds you put the right thing there, then it assumes you have control of that website, and provides you with the certificate.
On your local machine, run the certbot command that does manual verification: `sudo certbot certonly --manual -d SITEstg.prod.acquia-sites.com -d SITEdev.prod.acquia-sites.com` (where SITE is dependent on your specific Acquia setup). You'll keep this command running as you perform the next steps.
The "certonly" and the "--manual" are the main influencers here. Note that you can add as many -d's and domains as you need. If you have more dev environments than the standard stage/dev in Acquia (my client did), you can just keep adding the -d's. Note that also on my Mac I had to run this with 'sudo' in front of it, because it writes to /etc. You can also specify some additional parameters on the command to put these files in a separate location if you need.
Allow in .htaccess
This starts the process of verifying your sites. As you step through, it will give you some long, hash-y looking text strings that need to be available at a particular URL. According to the spec, this is at a .well-known/ folder off your site root. In order to allow Drupal to see this, you may need some changes to your .htaccess file.
If you're using a Drupal 8.3.x site (newer than Feb 9 2017), the issue has already been fixed. See https://www.drupal.org/node/2408321 for more information.
If you're using Drupal 7, then as of this writing it has not been fixed in core. See https://www.drupal.org/node/2847325 for more information. Essentially you need to allow .well-known in the FilesMatch directive at the top of .htaccess, and then exclude it from the main RewriteRule later down in the file.
Make verification "file" visible
The next thought you might have is, "OK, now I need to put all the files that need to be visible in that .well-known/acme-challenges/ry784yfy7...fdhj directory." Except, you don't really. (Pro tip: you do not need to enable live development mode on 4 environments at once and crash the server.)
The reason why not? The fabulous Let's Encrypt Challenge module. This lets you use the Drupal UI to enter your challenge information, or upload files to sites/default/files to answer the challenges. Download that module and push it to a branch, and set all of the Acquia environments your enabling Let's Encrypt SSL for, to use that branch. Enable the module on each dev/stage site, and as you walk through the certbot command (it gives you a challenge for each domain), log in to the site, enter the challenge, and hit save. You can then pull up the URL that certbot gives you, in order to verify that the module is doing what it promises. (Important note here, if you accidentally pull up the URL before you've changed .htaccess or enabled it, Acquia's Varnish is going to cache the bogus response and validation won't work. If you accidentally do this, be sure and flush the Varnish caches at Acquia for the environment where you got an itchy trigger finger.)
When the certbot process completes, it will tell you where you can find the certificate files needed. These are stored locally on the machine where you run certbot, in the case of a Mac with certbot installed with Homebrew, in /etc/letsencrypt/live/FIRSTDOMAIN (where FIRSTDOMAIN is the first domain you passed into your certbot command, above).
Tell Acquia You Got the Goods
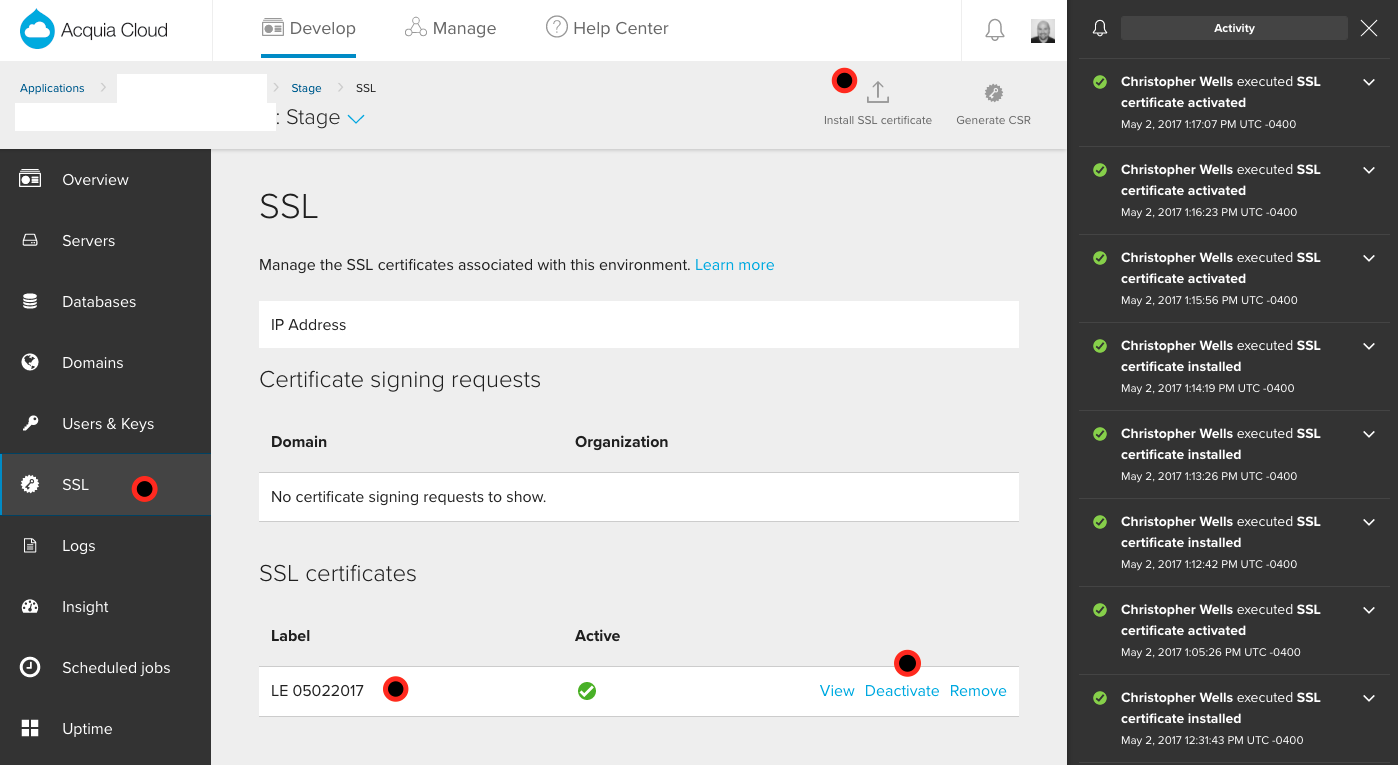
This is a two-part process. By logging into your Acquia console, you must go to each individual environment and go to the SSL section, in the nav at the left hand side. From there, you can click "Install SSL Certificate" at the top. You will be prompted to enter four pieces of information: (1) a name for your certificate (ex.g. "LE 05022017" because it's Let's Encrypt and the day it was created), (2) the private key for the certificate (use privkey.pem from the folder above, where certbot put all this info), (3) the certificate itself (use cert.pem), and (4) the "chain" certificate (often called "intermediate" certificate), which establishes security from your certificate all the way to a Root Certification Authority (use chain.pem). NOTE: with Acquia, you will not use fullchain.pem. This is simply a file that concatenates all the information together into a single certificate file.
The second part of this process is to click "Activate" next to the certificate once the "installing" activity is completed.
Again, this needs to be repeated for each environment, but with the same certificate information.
In the below screenshot I've tried to call attention to some relevant parts of the SSL screen in the Acquia console:

We hope this proves helpful in getting some basic SSL certificates installed in your own Acquia environments!
